Running Stable Diffusion Locally
Contents
· Intro
· General Instructions (Nvidia and Apple M-series GPUs)
Intro
While there are many online AI image generators that utilize Stable Diffusion, DALL-E, or Midjourney, most have a limit on how many images you can generate per day or require a subscription. The free way with no limits on what you can generate is to run Stable Diffusion locally. It sounds complicated, but it’s easy with AUTOMATIC1111’s Web UI for SD.
This guide is based off of the official guide provided by AUTOMATIC1111 on their GitHub page and from u/ImTheArtCurator’s post on running the Web UI on Linux with AMD GPUs
System Requirements
This can run on:
· Windows 10/11
· Linux
o Ubuntu (confirmed on 22.04 LTS, unconfirmed on 24.04 LTS and on non-LTS releases)
o Debian (Confirmed on 11, may also work on 12)
o Arch Linux
o Fedora/RHEL/Rocky Linux (I have confirmed it will work on Fedora 39 and 40 as well as RHEL/Rocky Linux 9.3)
o SUSE Linux Enterprise 15 SP 4/openSUSE Leap 15.4 and up (not confirmed on openSUSE Tumbleweed)
o Possibly other distros if it’s based on one of the distros mentioned above.
· macOS (confirmed to work on macOS 14 a.k.a Sonoma)
Your computer will also need a GPU for the best performance. While it can run on the CPU only, performance is not great, and it can take several minutes to render a 512 x 512 image. With the use of a GPU, the same 512 x 512 image can be generated in seconds. Note: most gaming PC’s and laptops will have either an Nvidia or AMD GPU.
The following GPUs can be used:
· Nvidia RTX 30 series or above (Recommended)
o GPUs with more VRAM (12 GB and up, 16 GB and up recommended) will provide better performance.
o This will still work on RTX 20 series GPUs
o As far as I know, this will work with GTX 16 series GPUs and earlier, but will not perform as well as newer GPUs since these lack Nvidia’s Tensor cores (AI/HPC cores)
· AMD Radeon RX 6000 series or above
o As with the Nvidia GPUs, more VRAM is better (16 GB and up recommended)
o I’ve read that it can work with RX 5000 and earlier, but I have not tested this.
o Since AMD’s ROCm software is not available in Windows, it’s better to use Linux if you have an AMD GPU
o Best performance will be with RX 7000 series GPUs since they contain AMD’s AI accelerators
· Intel ARC
o See here for Intel CPU/GPU instructions
· Apple Silicon Macs
o It appears this will not run on Intel-based Macs
o I personally would not recommend this on Macs with only 8GB of unified memory to prevent excessive swap space usage.
o Despite all Apple Silicon-based Macs having the Neural Engine (Apple’s term for an AI accelerator/NPU), Stable Diffusion does not make use of it currently.
o I would personally recommend running this on a Mac with M1 or M2 Pro/Max/Ultra CPU or any variant of the M3.
· Other System Considerations
o If you have a supported GPU, it doesn’t matter much on what CPU you have.
o Even though this primarily uses VRAM, portions of loaded models are stored in system RAM. 16 GB appears to be enough for SD 1.5 based models. Using SDXL models on a system with 16 GB of RAM led to swap usage in my testing.
o If you plan on using multiple SD models, you may want to make sure you have adequate storage space. Models can range from 2 to 7 GB in size depending on if it’s regular SD or SDXL based.
Software Requirements
Software-wise, you will need Git, Python (specifically Python 3.10), and the latest drivers for your GPU
· Windows: Download Git from here. Use the standalone version. Download Python from here. Nvidia Drivers can be found here. AMD drivers are found here. Intel ARC drivers can be found here.
o Be sure to select the Add to PATH option when installing Python.
· Linux: if Git and wget are not already installed, run the following in the terminal:
o
Note: run python –version or python
-V to check your currently installed version of Python. If it’s anything
other than 3.10.x, specify python3.10 when using Python or installing it,
unless noted otherwise.
o
Debian-based distros: sudo apt update && sudo apt install wget git python3
python3-venv
§
You will need to build Python 3.10 from source
if using Ubuntu 24.04 LTS since it ships with Python 3.12
o
RHEL-based distros: sudo dnf install wget git python3
§
You will need to build Python 3.10 from source
if using any Enterprise Linux based distro. It can be installed via the package
manager in Fedora.
o
Arch-based distros: sudo pacman -S wget git python3
o
SUSE (use python as written): sudo zipper in wget git python310
o
Nvidia GPU driver installation can vary based
on the distro you’re using. Ubuntu and openSUSE make it simple, while the same
cannot be said for others. Search for instructions for your specific distro if
you don’t already have drivers installed.
o
AMD driver installation is covered in the
Linux portion of the AMD Installation
Instructions.
o
If you need to build from source due to Python
3.10 not being available via your distros package manager, pyenv makes this process easier.
o
Optional: You can install the Google
performance tools package for better CPU performance. The package name may vary
·
macOS: You will need to install Homebrew if
you don’t have it already. You can find it here and using
the .pkg installer is preferred.
o
Then run: brew install cmake protobuf rust python@3.10 git wget
o
GPU drivers are already included in macOS.
General Installation Instructions (Nvidia GPU & Apple Silicon)
· Ensure the software requirements are met.
· If you have an AMD GPU, please follow the directions in the AMD section.
· Run the following command: git clone https://github.com/AUTOMATIC1111/stable-diffusion-webui
o For better performance and the ability to use Flux-based models, use this fork instead: https://github.com/lllyasviel/stable-diffusion-webui-forge.git
o If you’re using Forge instead of the original, replace stable-diffusion-webui with stable-diffusion-webui-forge in the commands below
· Windows:
o Go to the folder where Git pulled the files (Usually C:\Users\[your_ysername]\stable-diffusion-webui)
o Run webui-user.bat
· mcaOS and Linux:
o Run the following command: cd stable-diffusion-webui && ./webui.sh
· macOS and Linux (Alternative Method: Directly create Python Virtual Environment)
o
cd
stable-diffusion-webui
o
python -m venv
venv (specify
Python 3.10 if necessary)
o
source
/venv/bin/activate
o
python -m pip
install --upgrade pip wheel
o
The web UI should install the correct versions
of PyTorch and Xformers (Nvidia only) on first launch, but you can install
these before running to ensure their installation:
§
pip install
torch torchvision torchaudio --index-url https://download.pytorch.org/whl/cu121
§
Nvidia GPU only: pip install xformers
o
python launch.py
§
Optional, but recommended (Nvidia GPUs only):
add the --xformers flag when launching for better performance. It will install
xformers if you don’t already have it installed.
§
You can also add the –cuda-malloc flag for
better performance on Nvidia GPUs (Forge only)
·
Now that you up and running, view the Basic tips, the layout of the UI,
and some tips for writing prompts that helped
me.
AMD Installation Instructions
DirectML performance in Windows is better than using the CPU only, but doesn’t take full advantage of AMD GPUs. Using Linux is recommended for the best performance with an AMD GPU, which will take advantage of AMD’s ROCm API (similar to CUDA on Nvidia GPUs).
· Windows
1. Ensure the software requirements are met
2. Copy and paste the following command into Command Prompt or PowerShell: git clone https://github.com/lshqqytiger/stable-diffusion-webui-directml && cd stable-diffusion-webui-directml && git submodule init && git submodule update
3. Run .\webui.bat --use-directml
4.
Now that you’re up and running, view the Basic tips, the layout of the UI,
and some tips for writing prompts that helped
me.
· Linux
1. Ensure the software requirements are met
2.
Run the following command and reboot
(Debian-based distros only): sudo apt
install libnuma-dev libncurses5
3.
Add yourself to the render and video groups: sudo usermod -aG render ${USER} && sudo
usermod -aG video ${USER}
4.
Go to AMD’s Linux Driver page and
download the appropriate package for your distro
§
There is no official Debian package, but the
Ubuntu packages should work just fine (I haven’t personally tested this
since I have Ubuntu).
§
If you’re using Ubuntu 22.04, do not use the
one that specifies it includes ROCm.
§
There is not an official driver package from
AMD for Arch and Arch-based distros.
Follow the steps here to
install ROCm for the best performance.
§
The RHEL 8 & 9 packages will not work on
Fedora, since Fedora is updated more frequently than RHEL. Use the following
instead:
·
sudo dnf install
rocminfo rocm-opencl rocm-hip
·
Once installed, skip to Step 7.
·
If you’re using Fedora 38 and dnf cannot find
rocm-hip, the testing repo may need to be enabled.
5.
Navigate to the directory where you downloaded
the file and use your package manager to install
§
Debian: sudo
apt install ./name_of_file
§
RHEL: sudo
dnf install ./name_of_file
§
SUSE: sudo
zipper in ./name_of_file
6.
After that completes, run the following
command: sudo amdgpu-install
--usecase=rocm,hip,mllib,graphics --no-dkms
§
Not including the –no-dkms flag will cause issues if your system
if Secure Boot is enabled in your BIOS.
§
The --no-dkms flag may or may not be needed if
Secure Boot is disabled.
7.
Run this command to confirm the installation
was successful, then reboot: sudo
rocminfo | grep ‘Name’
§
This should provide the name of your GPU and
CPU (if also using an AMD CPU)
§
If your GPU does not appear here, reboot and
try again.
§
If it still does not appear, uninstall the
drivers, and reinstall.
·
Fedora: sudo
dnf remove rocminfo rocm-opencl rocm-hip
·
All other distros: sudo amdgpu-uninstall or sudo amdgpu-install --uninstall
8.
If you haven’t already, install Python, Git, python3-venv,
and pip (see the software requirements)
§
Ubuntu: run python –version to make sure that the default isn’t Python 2.
If it is, run sudo apt install python-is-python3
9.
Clone the Git repo with: git
clone https://github.com/AUTOMATIC1111/stable-diffusion-webui.git
10. Run the
following commands:
§
cd
stable-diffusion-webui
§
python3.10 -m
venv venv
§
source
venv/bin/activate
·
Specifying Python3.10 is not needed beyond
this point since you will be in the virtual environment (venv) creted by Python
3.10. You will need to specify the Python version once outside of the
environment.
§
python -m pip install
–-upgrade pip wheel
11. Run the
following command: pip3 install torch torchvision torchaudio --index-url
https://download.pytorch.org/whl/rocm6.4
·
This may take a moment to download and install
all of the necessary packages.
·
Be sure to check https://pytorch.org
for the latest version of PyTorch before installing.
12. Run the
following command to ensure the ROCm versions of PyTorch are installed: pip list | grep ‘torch’
§
If the list does not include rocm in the name,
run pip uninstall
torch<version_number> and repeat step 10.
13. If you
have a RX 6750 XT or lesser GPU, run the following command: export HSA_OVERRIDE_GFX_VERSION=10.3.0
§
Not needed for the RX 6800 and above
§
Based on what I’ve read elsewhere, this needs
to match the appropriate GFX Version for you GPU. I am unsure of the specific
version for each GPU (I can confirm 10.3.0 is for the RX 6800/6800 XT/6900
XT/6950 XT since they’re all based on the same GPU die. All 7000 series GPUs
will have a version number starting with 11.)
14. Run this
to launch the Web UI: python launch.py
--precision full --no-half
§
If your GPU has less than 12 GB of VRAM, add
either the --medvram or --lowvram flag after --no-half
15. Now that
you up and running, view the Basic tips, the layout of the UI, and some tips for writing prompts that helped me.
Basic Tips
· The first launch may take a while. Subsequent launches will be faster.
· If the UI doesn’t open automatically in your web browser, go to one of the following:
o http://127.0.0.1:7860
o http://localhost:7860
· When launching again after using it for the first time, you can quickly access it by navigating to the directory where Git pulled all the files and run:
o ./webui.sh -–any-needed-flags (Linux and macOS)
o .\webui.bat --any-needed-flags via Command Prompt/PowerShell (Windows)
· The base Stable Diffusion 1.5 model is downloaded if no other models are found on the first run. You can find additional models (also called checkpoints) on HuggingFace and CivitAI.
o Once you have downloaded a checkpoint, they go in the models > Stable-diffusion folder in the folder where the Web UI was installed. Unless you specified installation in a different location, it will be in you user/home folder.
§ Windows: C:\Users\your_username\stable-diffusion-webui\models\Stable-diffusion
§ Linux: /home/your_username/stable-diffusion-webui/models/Stable-diffusion
§ macOS: /Users/your_username/stable-diffusion-webui/models/Stable-diffusion
o These are typically .ckpt or .safetensors files
· If you run into any errors dealing with running out of VRAM, try using the --medvram or --lowvram flag.
o Or instead, you can select a Cross attention optimization option under Settings > Optimizations in the Web UI (sub-quadratic has worked well for me)
· The --skip-torch-cuda-test flag may be needed if you receive an error stating that your GPU is not supported.
o This will have the image generation use your CPU instead of your GPU. It will work, but will be significantly slower.
o If you’re using an AMD GPU and running Windows, make sure you use the --use-directml flag to avoid this issue.
· Nvidia GPUs only: If you have an issue with using xformers, do the following:
o Stop running the web UI if you haven’t already
o Delete the venv folder
o Rebuild the venv folder via python -m venv venv (specify python3.10 in the command if necessary)
o Enter the virtual environment
o Update pip and wheel: python -m pip install --upgrade pip wheel
o Install torch: pip install torch torchvision torchaudio
o Install all other needed requirements: pip install -r requirements.txt
o Install xformers: pip install xformers
o Relaunch the UI
· When done, close the tab in your web browser, navigate back to your Terminal or PowerShell window, and press CTRL- C to terminate the program.
· Using the --listen flag allows you to access the web UI on another machine on your local network. Once it’s running, navigate to http://remote_machine_ip:7860 or http://remote_hostname:7860
o Depending on your machine’s firewall configuration, opening TCP port 7860 may be necessary.
o If you’re using extension for the web UI, also call the --enable-insecure-extension-access with the --listen flag.
o Since HTTPS is not used, it is highly recommended to only use this on a secure local network and not on any public networks or over the internet.
· SD 1.5 models are primarily designed for generating 512x512 images, but are usually capable of generating 768x768 and possibly up to 960x960. Anything larger will typically provide undesirable images.
· SDXL models are primarily designed for generating 1024x1024 images (double of regular SD models). Like standard SD models, you can typically generate images larger than that, but you will run into undesirable results if you go too high.
The Web UI

These key areas are the base of what you need to get started on generating images:
1. Checkpoint List: Allows you to choose from the checkpoints found in the models > Stable-diffusion folder
2. Prompt Box: This is where you type in what you want to generate.
3. Negative Prompt Box: This is where you specify things you do not want in the generated image.
4. Sampling Method: There are different algorithms that can be used when generating images. The default is usually fine unless the creator of a checkpoint specifies a different one.
a. An additional drop down will appear here if you’re using an Nvidia GPU to better fine tune the sampling method. Otherwise, it will appear as shown above.
5. Sampling Steps: This adjusts how many iterations of an image it will use to create the final image. You may need to change this value if you’re not getting quite what you want (in addition to listing particular things in the negative prompt)
6. Hires. Fix: This section has options for upscaling generated images to a higher resolution than the originally rendered image
a.
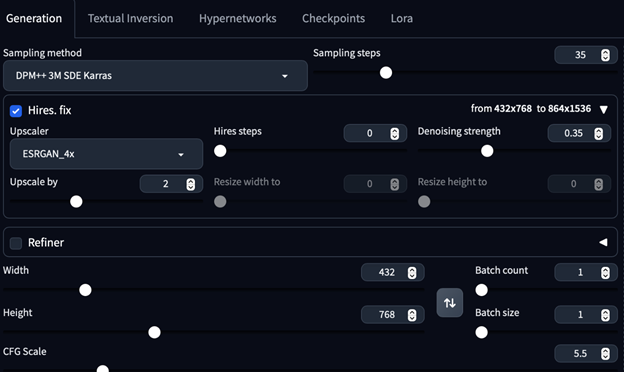
b. My personal recommendation when using Hires. Fix (SD 1.5 models)
i. Upscaler: ESRGAN_4x
ii. Upscale by: 2
iii. Hires steps: 0
iv. Denoising strength: 0.2 to 0.3
1. The lower the denoising strength, the closer it will be to the original image.
c. I would recommend generating images at the default 512x512 to see if I like the generated image before trying to upscale since the 512x512 image will render faster.
i. Be sure to reuse the same Seed value (see below)
d. Additional upscalers can be found on HuggingFace and CivitAI.
7. Width and Height sliders: adjusts how large the image will be (before upscaling if Hires. Fix is checked).
a. Stable Diffusion works best with 512 x 512 or 768 x 768. Unexpected results may happen if image is greater than 768 x 768 before upscaling.
8. CFG Scale: This is a scale of how strictly the AI will follow the prompt.
a. Unless a checkpoint creator specifies a different value, the default value of 7 is typically fine.
9. Seed: A random number that is generated when rendering an image.
a. Leave as -1 to always generate a new seed value.
b. The recycle button will reuse the last generated seed value.
c. The dice button will revert back to a randomly generated value (-1)
d. If trying to replicate an image you found online and they provided the generation data, you can copy and paste the seed value here.
10. LoRA: Short for Low-Rank Adaptation. You can think of these as mini-Stable Diffusion models trained on a single subject (such as the look of a particular character from a video game).
a. LoRAs are also available on HuggingFace and CivitAI.
b. Once downloaded, place them in the Lora folder in the model folder.
i. These are usually .safetenssors files like the checkpoints, but are significantly smaller in size (~100-200 MB instead of ~2-7 GB)
c. To use a LoRA, go to the Lora tab and click on the LoRA you want to use. It will add it to the prompt and give it a weight of 1 (weights explained in the next section)
d. Multiple LoRAs can be used at the same time.
e. The creators of LoRAs will usually specify what trigger word(s) to use if necessary as well as a suggested weight value
f. Not all models work well with LoRAs and vice versa. The creator of that resource will typically provide guidance on how to use it, but you can always experiment.
11. Image Pane: This is where your image will appear while it’s rendering and once it’s complete.
Writing Prompts
· It’s typically better to be specific with what you want
· Different parts of your prompt need to be separated by commas. Small chunks is key
o Don’t do: 25 year old man with blonde hair and goatee, wearing a pinstripe suit, standing on a busy city street
o Do this instead: 25 year old man, blonde hair, goatee, wearing pinstripe suit, standing on a busy city street
o Creators of models will sometimes provide guidance on prompt writing for their models.
· The negative prompt is where you can specify what you don’t want in the image
· Weights
o Good for when the images that are generated don’t quite match what you want
o Weights tell the model to focus more or less on a specified part of the prompt
o Syntax- Use parenthesis around the portion you want to add weight to, a colon, and a numerical value
§ Values of 1 or greater: Focuses more on the specified part
§ Values less than 1: Less focus on the specified part
§ Not specifying a numerical value will use a weight of 1.1
§ If using a LoRA, it will be given a weight of 1 once selected. Usually, you want a lower weight. The creator will usually provide the ideal range for that specific LoRA.
o Example:
§ 25 year old man, blonde hair, goatee, (wearing pinstripe suit:1.2), standing on a busy city street
o All of this also applies to the negative prompt
§ Example:
· ugly, malformed, weird, (blurry), low quality, bad hands
o Emojis can be used in both the prompt and negative prompt (not sure why you would want to, but you can)
Last updated: 2025-09-11 12:16 GMT -4